How to Install Nordfab® Quick-Fit® Ductwork: Step-by-Step Guide
Summary
An efficient Nordfab® Quick-Fit® installation saves time and improves system reliability. This guide gives a short safety checklist and nine practical steps — from verifying shipment contents and reading packing lists, to using adjustable nipples, pre-stretching clamps, supporting the duct, and securing cotter pins — so installs are fast, safe, and reconfigurable.
Important Safety Information
To ensure that Nordfab® Quick-Fit® continues to be the "World's Fastest Ducting," we want to provide you with a few tips to help your installation go quickly, smoothly and safely.Always use proper safety equipment when installing Quick-Fit®
- Work Gloves: Sheet metal can be sharp and burs are possible.
- Eye & Ear Protection: for use whenever cutting pipe.
- Safety Helmet: to avoid injury from falling parts or tools
- Cutting Device: There are several options for cutting galvanized or steel ducting. Whether you use a hacksaw, sawzaw, nibbler or other method, it is important that the cut is clean and that the pipe is not crushed into an oval shape during cutting. Follow all manufacturer safety guidelines for your cutting tool.
- File: This ensures that any cuts you make for the adjustable nipple sections are clean.
- Scaffolding and proper safety equipment for working off the ground.
- Level: Most duct runs should be level. But NOTE that on some applications such as cement or oil mists, it is preferable for the runs to be angled so that any material that falls out of the airstream will drain out of the duct.
- Plumb: It is advisable that all vertical runs be plumb.
Step 1. Double check to ensure your shipment is complete and undamaged
Most Nordfab® orders are shipped FOB or 'Free On Broad' meaning that it is the buyer's responsibility to make sure all materials received don't have any freight damage and that all the boxes in your shipment are delivered by the carrier.
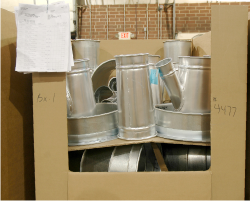
Step 2. Understanding the packing documents
In our effort to reduce shipping costs, Nordfab® does not pack boxes in the order that parts are needed. There will be at least one box per order that contains the Nordfab® Packing List. It is important that you first read these documents to find out what is in each box. Refrain from opening boxes until needed to lower the risk of parts being lost or damaged.
If you have any issues with your order, please call us at (888) 995-1207 and have all of your packing documentation readily available.
Step 3. Preparing ducting installation
It's essential that the installer understands the layout that was planned for the ducting system. Follow all local codes and regulations and take note of the structures loading abilities to ensure that the ducting is properly supported and that the building is able to carry it. If your installer doesn't understand the system layout, they will not have all the parts required to accurately complete the job. If you're not clear on the understanding or drawing of your ducting system, please contact us for clarification before attempting to install.
Step 4. Laying out the duct
Lay the ducting system out on the floor below where it will hang. 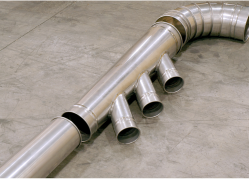 Remember that two connecting parts will often not be in the same box, making this step crucial in reducing installation time.
NOTE: During this step you may find that you don't have all the parts required to complete your project. If so, contact our specialists immediately to verify that your layout matched the one planned by our system designers.
Step 5. The adjustable nipple
One essential benefit of Quick-Fit® is that it's not required that you take exact measurements before cutting each piece of piping. The adjustable sleeve is an 11-inch section of pipe that has a larger diameter than a standard QF® duct.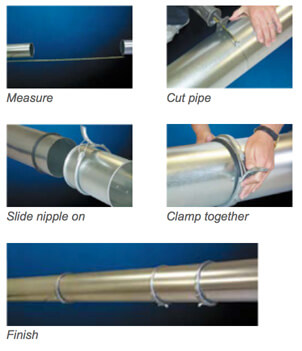 To use an adjustable nipple:
1. Measure the distance you want to span
2. Cut the pipe (NOT the 11" nipple) exactly 4" shorter than the length needed to complete the span
3. Ensure that the cut maintains its round shape and is free of burrs
4. Slip the cut end of the pipe into the adustable nipple
5. Clamp one end of the assembly into place. Make sure that the 11" nipple is closest to the dust collector of the cut piece
6. Slide the pipe into the nipple to the desired length, there must be at least 4" of pipe inside the nipple
7. Slide the o-ring across the rolled edge of the 11" nipple so that it is around the cut piece of pipe. Roll it until it is sealed against the rolled edge of the nipple. The o-ring will creat a seal and provide a rolled surface the Quick-Fit®clamp to grab
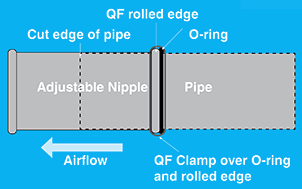 8. Use a standard QF clamp to connect the rolled edge of the adjustable nipple and o-ring together
9. Once in place, you can readjust the length of the assembly by releasing the clamp and changing the length of the pipe that is inserted into the nipple
IMPORTANT SAFETY NOTE: To guarantee a strong, safe and secure system, there must always by at least 4 inches of duct inserted into the adjustable nipple
Step 6. Supporting your ductwork
Nordfab® offers a full range of duct hanging devices, however, it is your responsibility to ensure the safety of all ducting. Check with local agencies to make sure that your ducting support meets local codes. When determining the weight that your ceiling and pipe hangers will support, always allow the ducting to be 100% clogged with whatever material is being transmitted.
 Step 7. Pre-strech clamps
Because Nordfab® clamps are designed to provide a tight seal, they require some pressure to close. By pre-streching the duct clamp around the rolled edges of a single piece of pipe, you'll be able to close it easier once two pieces have been connected.
Step 8. Clamp as many parts as you can on the ground
It's more efficient to close the clamps on a stable ground than on a scaffold. Many installers connect 2 or 3 pieces of ductwork together on the floor before lifting them into place.
IMPORTANT SAFETY NOTE: Ducting must be properly supported.
It's unsafe to have several segments cantilevered without support. Each additional piece of pipe puts excessive amounts of pressure on the clamps and hangers which could result in catastrophic clamp or pipe hanger failure.
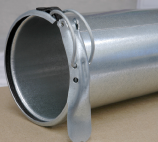
Step 9. Utilize the cotter pins
After closing each clamp, install an enclosed cotter pin into the hole as shown right. 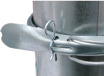 This will ensure that clamp cannot come open unexpectedly. Install the cotter pin as soon as a clamp is closed and beware of clamps until the cotter pin is safely installed.
IMPORTANT SAFETY NOTE: On rare occasions, unpinned clamps can spring open which can cause the pipe to drop. The handles on unpinned clamps have also been known to cause injuries when springing open.
FAQs: Nordfab® Ducting Installation
What safety gear do I need to install Nordfab® Quick-Fit® ducting?
Wear work gloves, eye and ear protection, and a helmet. Use proper scaffolding and cutting devices, file burrs, and follow tool manufacturer safety guidelines.
How do I know if my shipment is complete and undamaged?
Check the packing list in the boxes, inspect all pieces for freight damage, and call your supplier with the packing documentation if anything is missing or damaged.
What is an adjustable nipple and how do I use it?
An adjustable nipple is an 11” rolled-edge pipe section that allows fine length adjustments. Cut your pipe 4” short of the span, insert into the nipple with at least 4” overlap, add the o-ring, then clamp.
How should I support the ductwork?
Use adequate hangers and supports rated for the full loaded weight (assume 100% clogged load). Follow local codes and manufacturer recommendations.
Why pre-stretch clamps?
Pre-stretching clamps around a single pipe makes final clamping easier after assembly and ensures a uniform seal.
How important are cotter pins?
Very — cotter pins prevent clamps from opening unexpectedly. Install them immediately after closing clamps.
You may also like:
• 8 Reasons to Use Nordfab® Ducting
• Key Components of Nordfab® Ducting Systems
• Dust Collector Ducting Design